
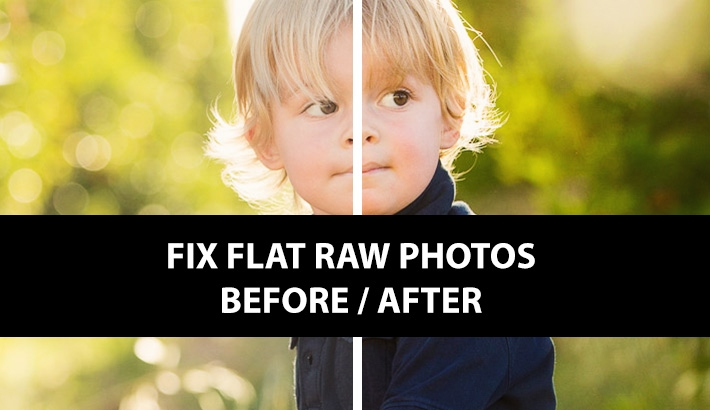
Shooting photos in RAW is the choice of most professionals. Unfortunately, we all know that once you import those photos into Lightroom, the vibrant images viewed on your camera LCD suddenly look flat. What if there were a quick fix that would make your RAW images better replicate what you see on your camera?
One of the keys to running a more efficient business as a photographer is to find the tasks that we repeat most often and find the most effective ways to do those. One of those tasks that I found myself doing over and over again was trying to make my RAW images pop like they seemed to do in the camera. The reason for the different look was because my camera LCD is showing me a processed JPEG preview, whereas the photo in Lightroom is the unprocessed RAW image. I therefore decided that I would put together a preset that I could apply to every image on import and would give me a baseline with which to start all my edits.
Before I share the information below, I must caution everyone. There is no one preset that is going to work perfectly for everyone. Each camera is different; each person shoots a little differently; each lighting situation is different; and last of all, everyone has different tastes. However, the following has worked wonders for me, and over the last couple years I have shared it with hundreds of photographers who have been grateful for the small but very useful tip that has saved them lots of time in post processing. So, I thought I would go ahead and share it here in case it could be beneficial for you, as well.
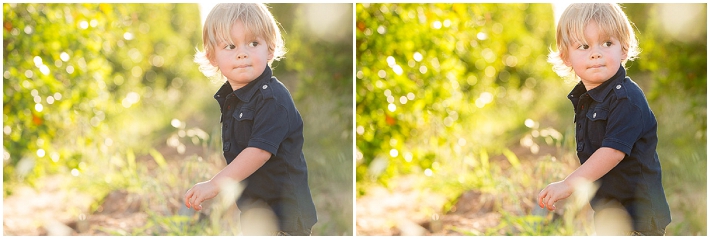
I simply call it my "Dayley Booster Shot", and I apply the preset to every RAW image when importing my photos into Lightroom. (Continue reading below to learn more about how to set up Lightroom to apply the preset on import.)
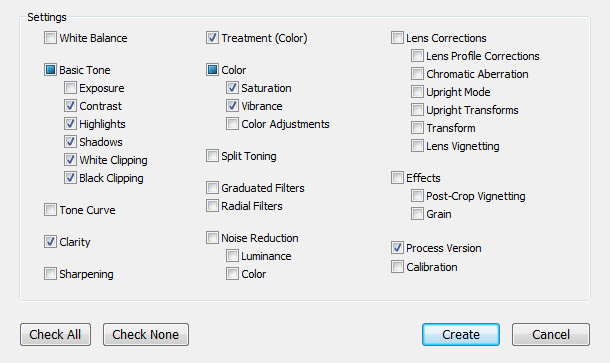
Here are my exact settings I apply to every image through my preset.
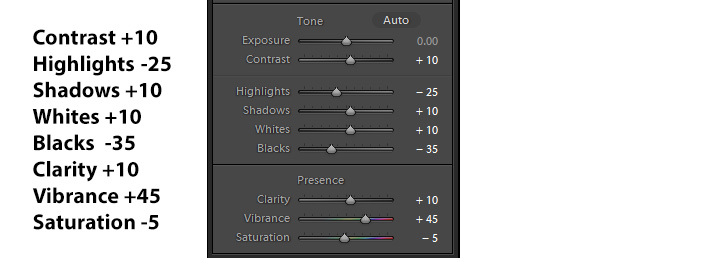
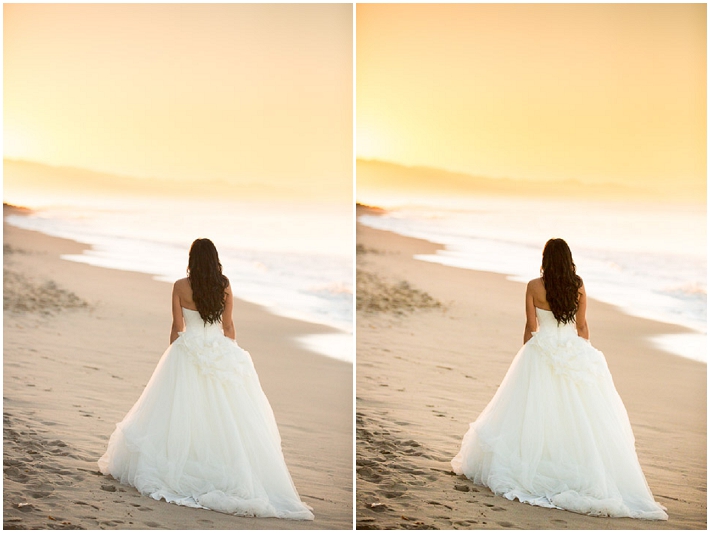
If you decide to use these settings and make your own preset, make sure you only check these 8 settings to change. You don't want your exposure, white balance, crop or any other of the important settings to be changed, as well. The goal of this preset is not to make every image perfect and ready for export. But what it has done for me is it has given me a great starting point to work with the photos. The colors and contrast now better reflect what I saw on the back of the camera.
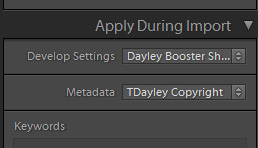
As I mentioned above, I apply this preset to all my RAW images when importing them into Lightroom. That is done in the "Import" screen by clicking on the menu "Apply During Import" and under the Develop Settings choosing the preset "Dayley Booster Shot." If you have given it a different name, then of course you would want to choose the name you have assigned to it. Now, when you import your RAW files, they will immediately display with the settings, and your files will look more like they did on the back of the camera.
If you would rather not apply the preset on import - or maybe you have already imported the files and want to apply the preset to all your images - there are two additional ways to do it. One is by adding the preset to one image in the Develop module and then choosing to "Sync" the settings to all your other images and select only the 8 settings above in the sync dialog box that pops up.
The second option, and one which I feel is even easier, is to go to your Library module. There you select all your images, and in the right menu box go to the very top and choose "Quick Develop." The first setting in the menu box there is "Saved Preset." When you click the drop down box you will be able to go in and choose the preset to apply to all selected images. The one benefit to doing this after you have already imported your images is that you'll be able to see the before and after to tell how well the preset worked on your photos. The easy shortcut to see a before and after of your image is by hitting the "\" key on your keyboard when you have the image opened in the Develop module.
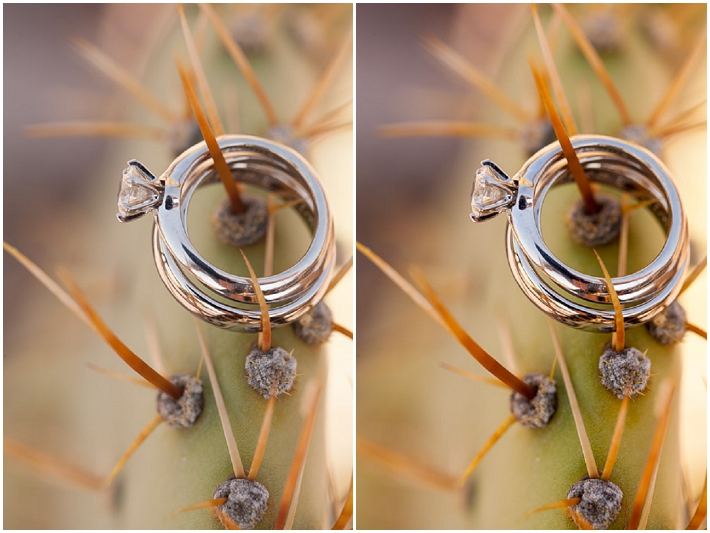
Now, as I mentioned above, this might not work perfectly for everyone's styles, and the effect might be a little strong or weak, depending on the size of files you are working with. If the images are already JPEG's (not RAW files), then it also might come off too strong. It has been an incredible time saver for me, and has given me a great baseline to start with for all my images, making them nice and colorful which is in line with the style of images I give to my clients.
If this has been helpful to you, let me know in the comments below. To see more of my work feel free to check out my website or Facebook page. Thanks!
Fuente: https://fstoppers.com/